


Read Graphic Organizers
Subject: Language arts
Grade: Eighth grade
Topic: Visual Elements
Please LOG IN to download the presentation. Access is available to registered users only.
View More Content
The Role of Graphic Organizers in Language Arts
– Visuals enhance communication
– Today’s focus: Graphic Organizers
– Visual tools that represent ideas and concepts
– Why they’re key in Language Arts
– They organize information, making it accessible and understandable
– Improving comprehension & retention
– Help students summarize and analyze texts
|
This slide introduces the importance of visual elements, specifically graphic organizers, in enhancing communication within Language Arts. Emphasize how visuals can simplify complex information, making it easier to understand and remember. Graphic organizers are invaluable tools for students to structure their thoughts, analyze texts, and improve their comprehension and retention of literary elements. Encourage students to think of times when visuals have helped them learn better and to consider how graphic organizers can be applied in their studies.
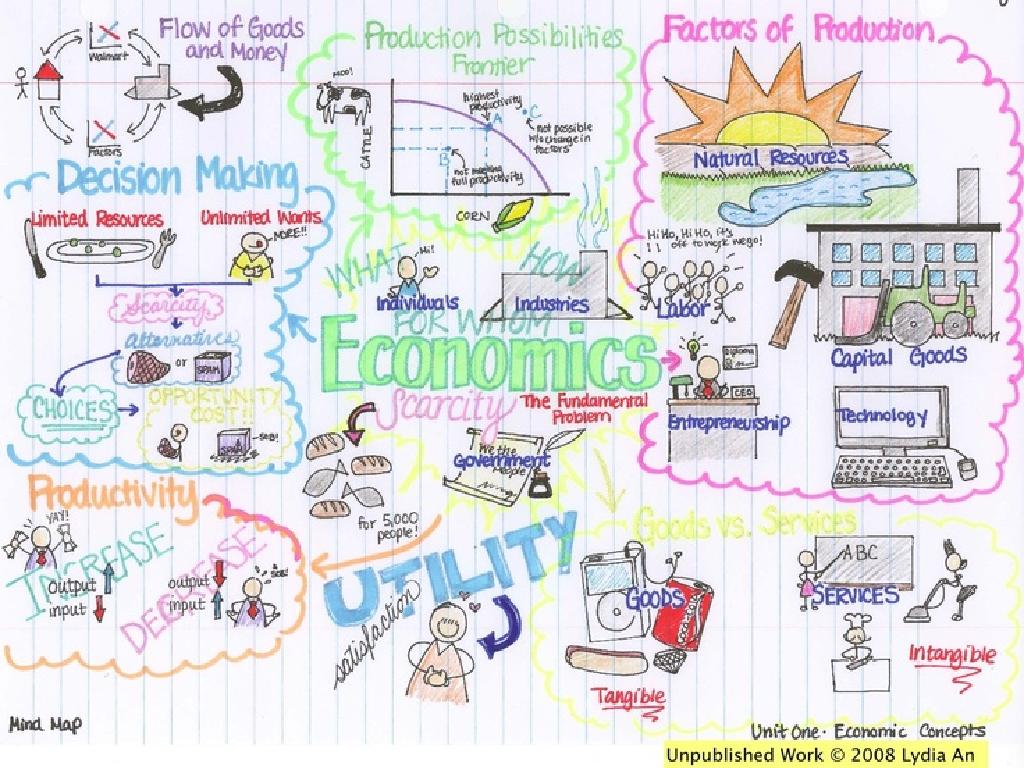
Understanding Graphic Organizers
– Define graphic organizers
– Visual tools to structure information
– Explore types: Venn, Flow, Mind Maps
– Venn: compare/contrast; Flow: sequence; Mind Maps: concepts/ideas
– Visualize and organize info
– Clarify complex information, see relationships
– Enhance learning and retention
|
Graphic organizers are visual representations that help students organize and structure information, making complex ideas easier to understand and remember. They come in various forms, each serving a specific purpose: Venn diagrams for comparing and contrasting, flow charts for sequencing events or processes, and mind maps for brainstorming and connecting concepts. By using graphic organizers, students can better analyze and retain information, which is crucial for developing critical thinking skills. Encourage students to use these tools in different subjects to enhance their learning experience.
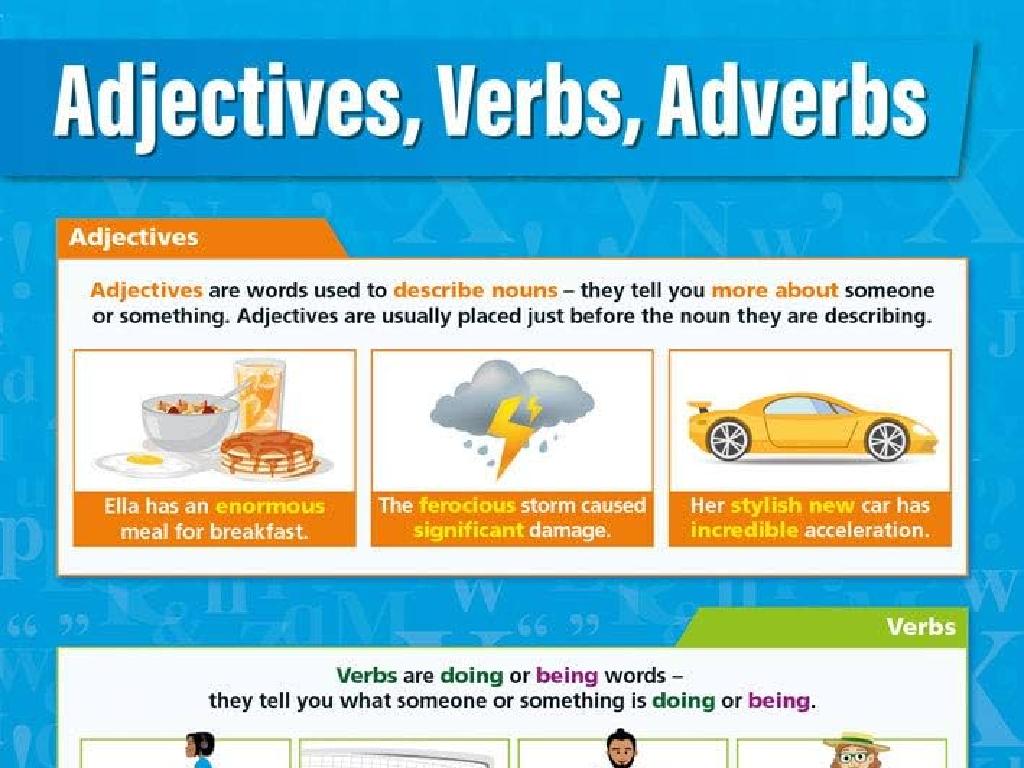
Exploring Graphic Organizers
– Identify titles, labels, images
– Titles guide the topic; labels & images clarify points
– Understand element connections
– Look for arrows, lines, or colors linking ideas
– Example: Story structure analysis
– Analyze a story’s plot using a graphic organizer
– Practice with a graphic organizer
|
This slide introduces students to the components and uses of graphic organizers in understanding complex information. Start by explaining how titles, labels, and images work together to organize and simplify information. Emphasize the importance of connections between different elements, such as cause and effect or sequence of events, often indicated by visual cues like arrows or lines. Use an example of a story structure graphic organizer to illustrate how it can break down the plot into manageable parts. Finally, engage students in a hands-on activity where they practice analyzing a text with a graphic organizer, reinforcing their understanding of the visual elements and their application in language arts.
Reading Strategies for Graphic Organizers
– Begin with the Main Idea
– Identify the central concept before details.
– Search for Patterns
– Patterns may indicate connections.
– Understand Symbols and Colors
– Symbols/colors can represent different ideas or categories.
– Relate Elements to Each Other
– See how different parts of the organizer link together.
|
This slide aims to equip students with strategies to effectively read and understand graphic organizers. Starting with the main idea helps in grasping the overall concept before delving into specifics. Encourage students to look for patterns and relationships as these often indicate how ideas are connected. Understanding the meaning behind symbols and colors is crucial as they are frequently used to differentiate between categories or to highlight important information. Lastly, students should be able to relate different elements within the graphic organizer to each other to see the bigger picture. Provide examples of graphic organizers and practice these strategies as a class.
Analyzing Graphic Organizers in Literature
– Venn Diagram: Compare characters
– Illustrates similarities and differences
– Timeline: Novel’s events sequence
– Shows progression of story chronologically
– Discuss organizers’ role in understanding
– Visual aids clarify complex information
– Examples enhance comprehension
|
This slide aims to demonstrate how graphic organizers can be used to analyze literature effectively. By examining a Venn Diagram, students can compare and contrast two characters, focusing on their traits, motivations, and development throughout the story. A timeline helps students visualize the sequence of events and how they unfold in the novel, aiding in their understanding of plot structure and pacing. Discussing the role of these organizers will help students appreciate how visual elements can simplify and clarify complex information, making it easier to digest and remember. Encourage students to create their own examples based on the reading material to reinforce their learning.
Crafting Graphic Organizers
– Selecting the appropriate organizer
– Match the organizer type with the kind of information you have.
– Steps for creating a graphic organizer
– Identify main ideas, choose a design, and organize information logically.
– Class activity: Make your own
– Read a short text and design an organizer to summarize it.
– Discuss and reflect on the process
|
This slide is aimed at teaching students how to choose and create their own graphic organizers. Start by discussing different types of organizers (e.g., Venn diagrams, T-charts, story maps) and how to match them with the information at hand. Walk through the steps of creating an organizer, emphasizing the importance of main ideas and logical arrangement. For the class activity, provide a short text and have students apply what they’ve learned by creating a graphic organizer that summarizes the text. After the activity, facilitate a discussion where students can share their organizers, explain their thought process, and reflect on how their organizers helped them understand the text. Provide guidance and examples as needed, and ensure that the activity caters to different learning styles.
Group Activity: Graphic Organizer Creation
– Divide into groups for a story
– Each group creates a graphic organizer
– Summarize the story using symbols, arrows, and shapes
– Present your organizer to the class
– Explain your organizer’s layout and choices
– Discuss the visual elements used
– Highlight how visual elements aid comprehension
|
This class activity is designed to enhance students’ understanding of graphic organizers as a tool for visual learning. By working in groups, students will engage in collaborative learning to create a graphic organizer for a short story assigned to them. Each group will then present their graphic organizer to the class, explaining the rationale behind their layout and visual choices. This activity encourages critical thinking and creativity, as students must decide how best to represent the story’s elements visually. The teacher should facilitate the group formation and story assignments, monitor the groups’ progress, and guide them in exploring different types of graphic organizers. Possible graphic organizers include Venn diagrams, flow charts, and story maps. The teacher should prepare to discuss how these visual elements help with understanding and retaining information.
Review and Reflection: Graphic Organizers
– Recap on graphic organizers
– Importance for future assignments
– Organizers aid in structuring thoughts and research for projects.
– Open floor for Q&A session
– Address any confusion regarding today’s lesson.
– Encourage questions and participation
– A chance to voice uncertainties or insights.
|
This slide aims to consolidate the day’s learning about graphic organizers. Begin with a brief recap of the key points covered, emphasizing how graphic organizers can help students plan and structure their ideas for essays, projects, and studying. Highlight the importance of these skills in future assignments, and how they can lead to clearer, more organized work. Open the floor to questions, encouraging students to ask for clarifications or further explanations on any aspect of graphic organizers they may not have fully understood. This is also an opportunity for the teacher to assess comprehension and to reinforce the day’s learning objectives.
